Jenkins Tutorial for GitLab
Table of Contents
The system for automatic testing involves three components:
- the source code, it usually comes from a Source Control Management (SCM) system, which is either git or subversion.
- the computer where the tests are run, this is called the slave node.
- the Continuous Integration server, which is the Jenkins server.
A typical sequence of events for a build is:
- a code change is pushed by a developer to the SCM repository.
- the SCM system sends a message to the Jenkins server saying that something has changed.
- Jenkins starts running a test, this is called a build by:
- fetching the changes from the SCM repository.
- running the tests on the slave nodes
- notifying the developers of the results of the tests.
The goal of this tutorial is to demonstrate how to configure the different components to set up a test. We will use a Python code, available on GitHub, to define some simple tests. So the SCM system for this tutorial is git on GitHub.
First we will check that you can connect to the Jenkins server in Section 1. Then in Section 2 we will configure the authentication between the three components of the testing system—GitHub, the slave nodes and the Jenkins server—so they can communicate with each other. In Section 3 we go through the steps to configure a build.
Throughout this tutorial, the figures are scaled to fit on the current screen, if you need a larger figure, you can usually right click on it and choose Open Image in New Tab or Open Image in New Window.
1 Checking Your Internet Connection
For security reasons, the Jenkins server is only accessible when your computer is connected to the network with a wired connection on campus or when you are using the Secure Remote Access app.
You can verify that your connection is valid by going to show my IP and look at the top of the page for the line
Your Web client's IP address (from the perspective of this Web server) is:
your IP address needs to start with 128.112 for you to be able to access the Jenkins server.
2 Credentials for the Slave Node, GitLab and Jenkins
2.1 GitLab Setup
2.1.1 Clone the Tutorial Repository on GitLab
To follow this tutorial, you need an account on GitLab. You then need to fork the repository for the code used in this tutorial on your GitHub account. To do so:
- Go to the repository for the tutorial: https://gitlab.com/luet/jenkins_tutorial
- and click
Fork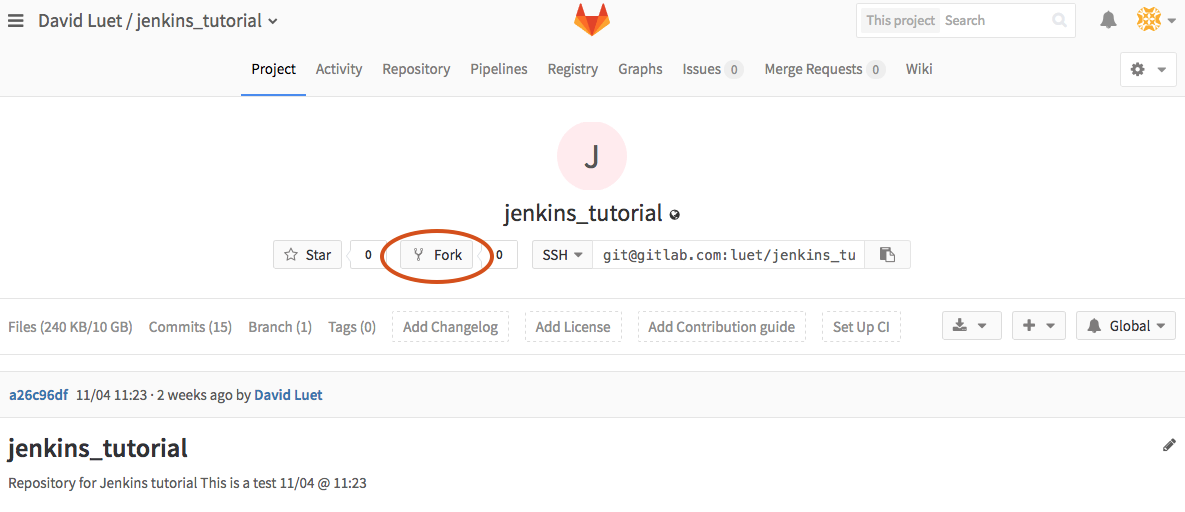
- This will create a repository on https://gitlab.com/GitLabID/jenkins_tutorial, where you should replace
GitLabIDby your GitLab ID.
2.1.2 Add buildbot-princeton as a collaborator
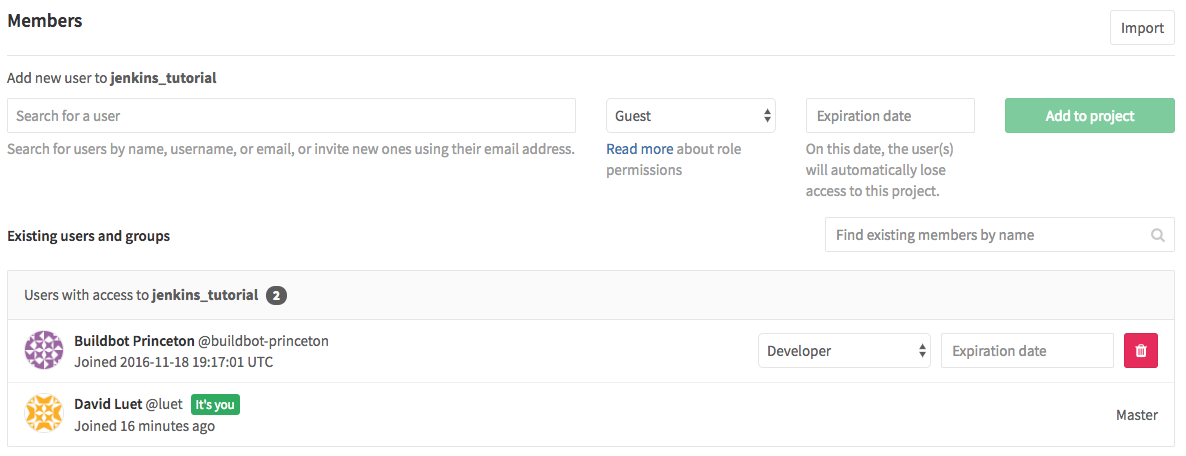
You need to add the GitLab user "buildbot-princeton", which is the GitLab id for Jenkins at Princeton, as a collaborator to your fork. Go on the settings (gear symbol in the top right) and select Members.
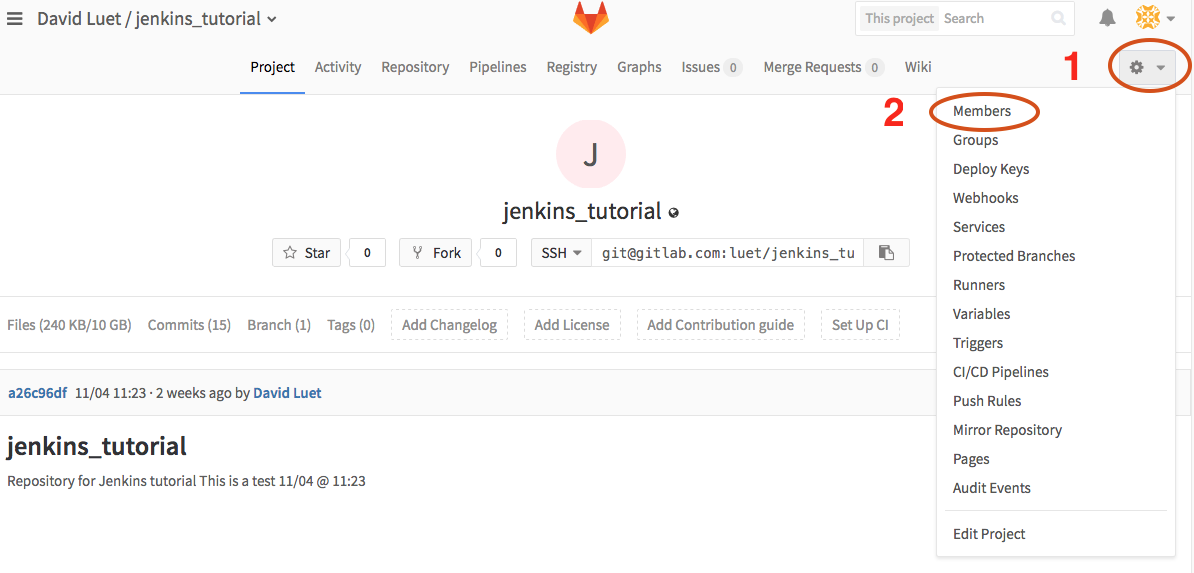
You need to give buildbot-princeton Developers permission.
Your Collaborators and page on GitHub should look like this:
2.1.3 Generate the ssh public and private keys
Now we are going to give the Jenkins server access to this GitLab repository using an ssh public/private key pair.
- Create a ssh public/private key pair on any machine that you have access to.
On a Linux or Mac machine you can generate those keys with the following
command:
$ ssh-keygen -t rsa -b 4096 -f id_rsa_gitlab -C "punetid@jenkins"
where you should replace
punetidwith your Princeton University netid. The command line options are:-fspecifies the name for the ssh keys, you should pick something meaningful to you.-Coption is a comment so you can use what you want.
You will be asked for a passphrase. You will need this passphrase when you copy the key to the Jenkins server.
- This command creates two files:
- the private key:
id_rsa_gitlab - the public key:
id_rsa_gitlab.pub
The private key will be copied on the Jenkins server and the public key will be copied on your GitLab account.
- the private key:
For more help on generating ssh keys, check the GitLab documentation.
2.1.4 Copy the public key to your GitLab account
Here is a summary:
- Connect to your GitLab account.
- Got to your repo (https://gitlab.com/GitLabbID/jenkins_tutorial).
- Click on the settings button (
 ) then
 Deploy keys(See the figure). - Copy the public part (
id_rsa_gitlab.pub) of your key. This should look like:ssh-rsa AAAAB3NzaC1yc2EAAAADAQABAAACAQDIHq5rydARXBMJeUO2ChE//D0p5nWNbBJugCvUmt3Bljf04AkePFiMskGpbn0kZdFkgDhDzjG6ICUGPc6HK-E4jnMrqRPLH6i6ukr3nZ2eV/VNKh6+F2x1u7zbFQQnroDVZ4f8/6LrKo39sY7BpYJZfy+Tk1q+G3EcpC1x8d3SjDQKeyptvdFTxe4BzlkRNVyMplU2hMXtp0/ti1FMSdBw/zTEqgpzjV+UW2QGwJsR9AUMEVKaebb22GVF/0Q90C38qtwRGR6z7Tib8GU78UYpYvuMDlZtLfmVRCIH48mMLon3z0KkbpBmtt9ZIJemYdHj9ldO0o7JscFhn/fhoViDAbRQ3puLCVzBD2Ke6FO9qgHTDPFLAplefAOFc36rCRuRQWlmgf7yvMlTuqmA5sZQCGn//P+NNS23fZya+0kMY3CVGmXNAFoIj5AkxuHG9JuU7P5aNNGtYmqGODkwudcCPbIANLGydn+0sNA+CfyGTEpbD/yTMlAKpCba8kut6Wqz2SjKlWfJW6TCgWRQrYYG2aeOmt4/LFJEf7COF463xbgAv/KCnza61bkIEg7YmeAvV6zvbyxCm6fwdwRkVGiuVEqSYqo+oqqQ+gL+RtxOK89opvpRL5Z/p2m/KJg36WkigmN0H70G2DwD6q0l/S+H9GjJCASkRj7n5vM3U8/qKQ== luet@jenkins
- and paste on your GitLab repository. This should look like this figure.
- Click
Add Key.
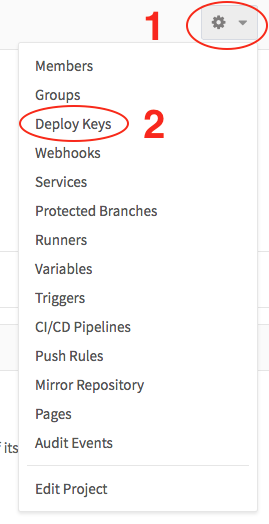
Figure 3: Menu for setting a deploy ssh key
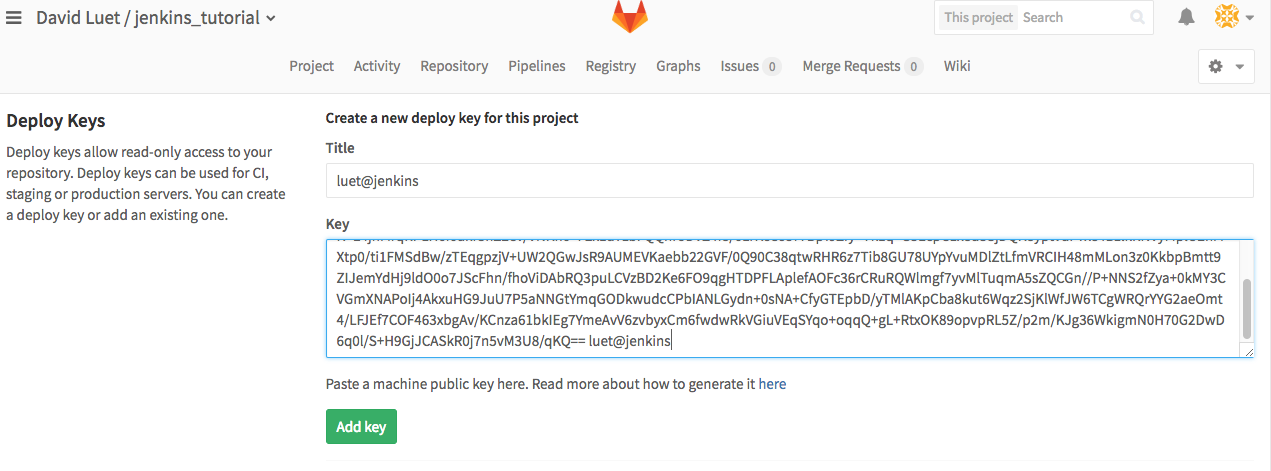
Figure 4: Adding GitLab deploy key.
2.1.5 Copy the private key on your Jenkins account
Now we need to copy the private part of the key to your Jenkins account.
- Connect to https://jenkins.princeton.edu with your Princeton University netid/password.
You will see the list of folders assigned to you, in this case there is one
folder called
tutorial_folder, in your case it will be the folder given to you by the Jenkins administrator.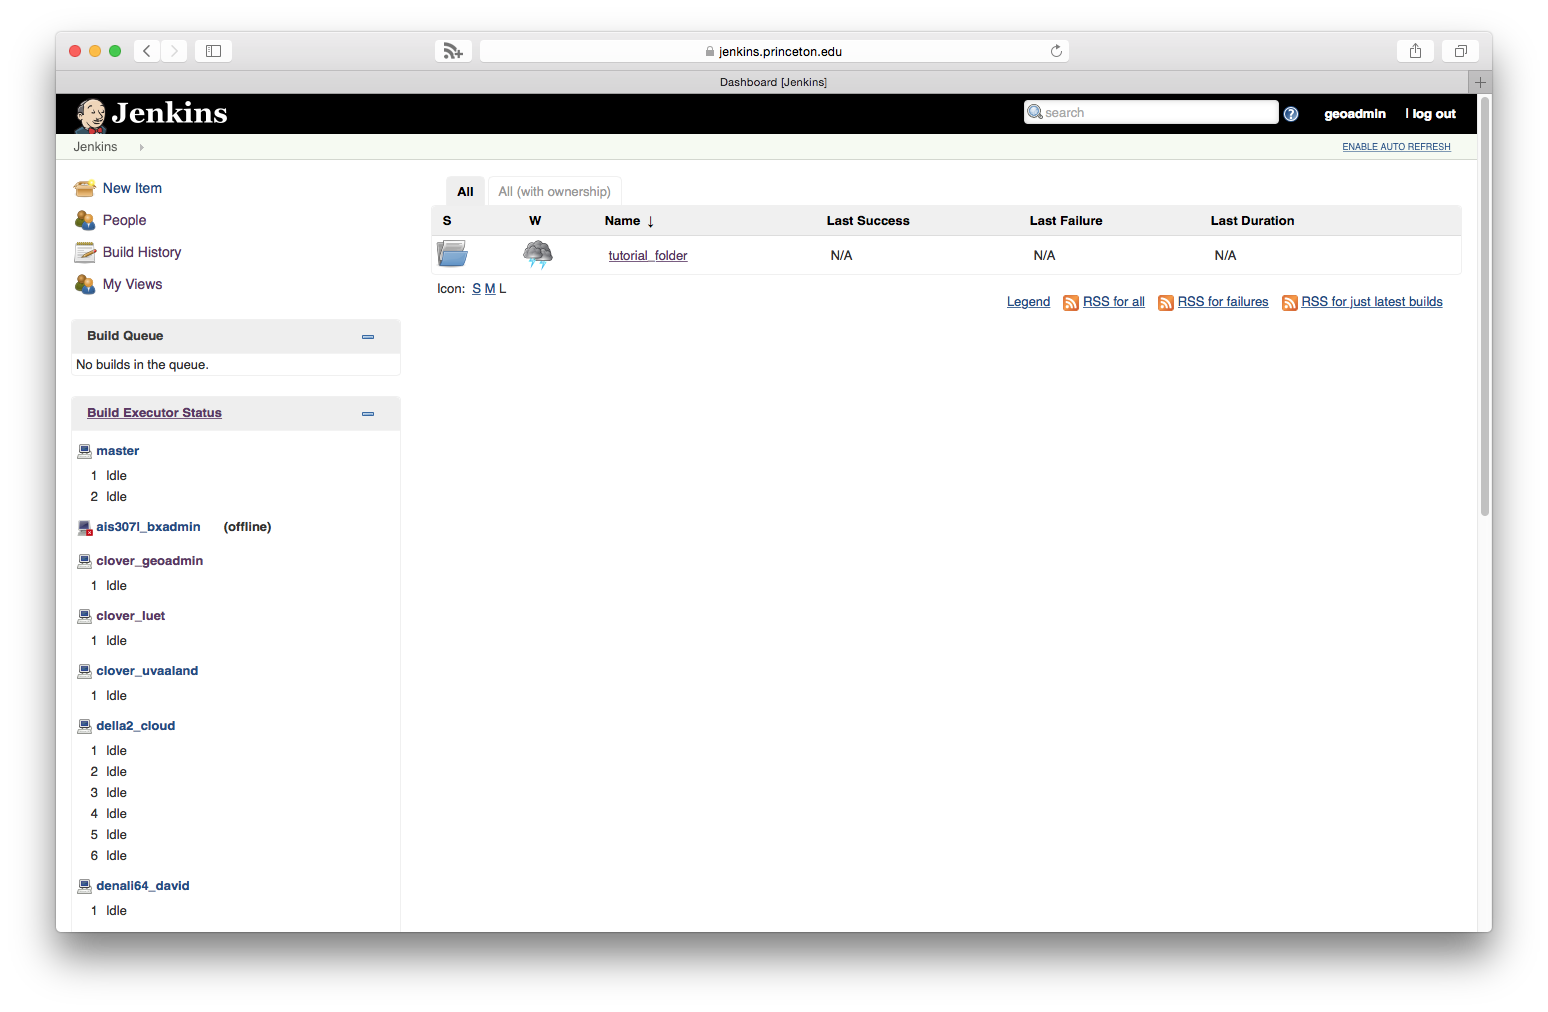
- Click on the folder
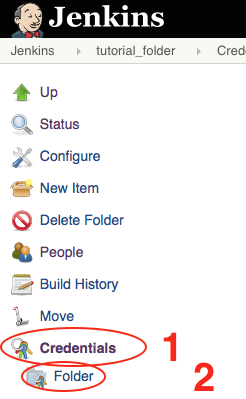
tutorial_folder - Click on
Credentials, thenFolderon the left-hand sidebar.
- Click on
Global credentials (unrestricted)
- Click on
Add Credentials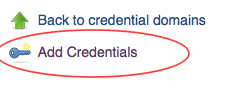
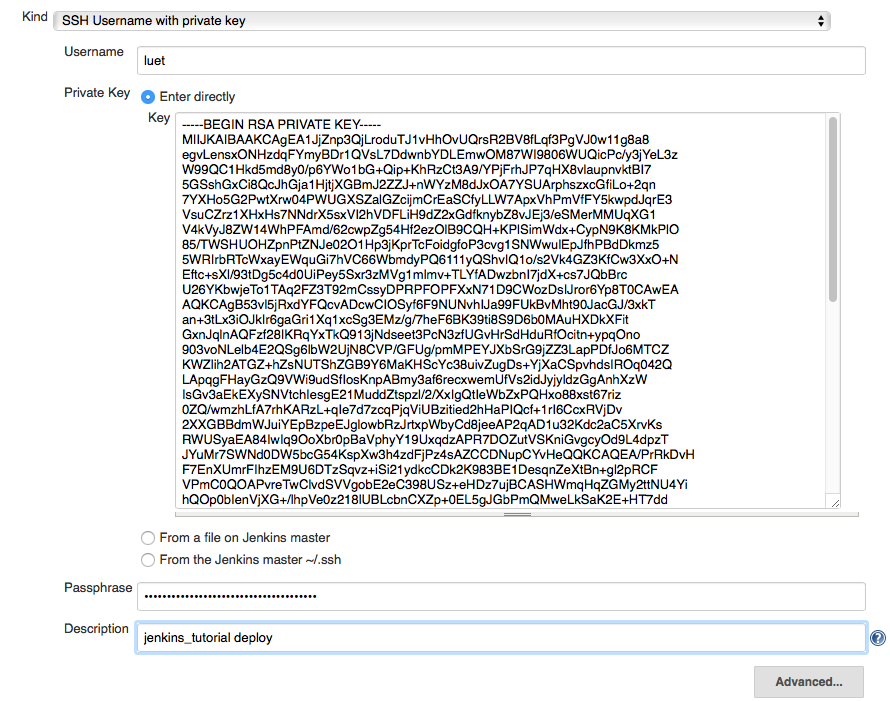
- Select:
- Kind:
SSH Username with private key - Username: your username on GitLab.
- Private key:
Enter directly. And copy paste the content of the private key fileid_rsa_github. - Passphrase: Enter the passphrase that you used when generating the ssh key in 2.1.3.
- Description: enter something that will make it easy to select the right
credentials later. I use
jenkins_tutorial deploy.
The page should look like this:
- Click
Ok.
- Kind:
2.2 Slave Node Configuration
Now we are going to give Jenkins access to the slave node.
The name of the slave node is slave.
The Jenkins system administrator will send you a file containing an
ssh public key named id_rsa_slave_punetid.pub that you need to copy on your
account on slave.
You can do it with the following steps:
- copy the ssh public key on
slave$ scp id_rsa_slave_punetid.pub punetid@slave.princeton.edu:~/.
- connect onto the slave host
$ ssh punetid@slave.princeton.edu
- make sure the directory
~/.sshexists and that the permissions are correct:[punetid@slave] $ mkdir -p ~/.ssh [punetid@slave] $ chmod 700 ~/.ssh
- Append the public key to the file
~/.ssh/authorized_keysand make sure the permissions are correct:[punetid@slave] $ cat id_rsa_slave_punetid.pub >> ~/.ssh/authorized_keys [punetid@slave] $ chmod 600 ~/.ssh/authorized_keys
- Create a directory called
jenkinsin your home directory[punetid@slave] $ mkdir ~/jenkins
3 Setting Up A Build in Jenkins
Now that we have set up all the necessary permissions between GitLab, Jenkins and the slave node, we are ready to configure some tests for the simple factorial code that is in your fork of the luet/jenkins_tutorial repository.
When you save your configure, you will see a note pop-up like this one:
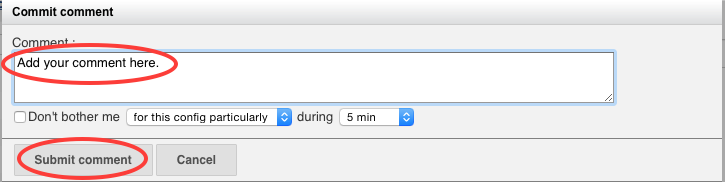
This is because the Jenkins configuration is saved in a Git repository itself. This way if you ever make a mistake in your configuration, and you cannot remember what you changed, you can ask the Jenkins administrator to revert to a previous configuration.
In the pop-up menu, you can either enter a comment for this commit or leave it blank. Then click on Submit comment.
3.1 Creating a Simple Build with Manual Trigger
- Go to https://jenkins.princeton.edu
- You should see the folder that was assigned to you. On the figure below, it's
tutorial_folder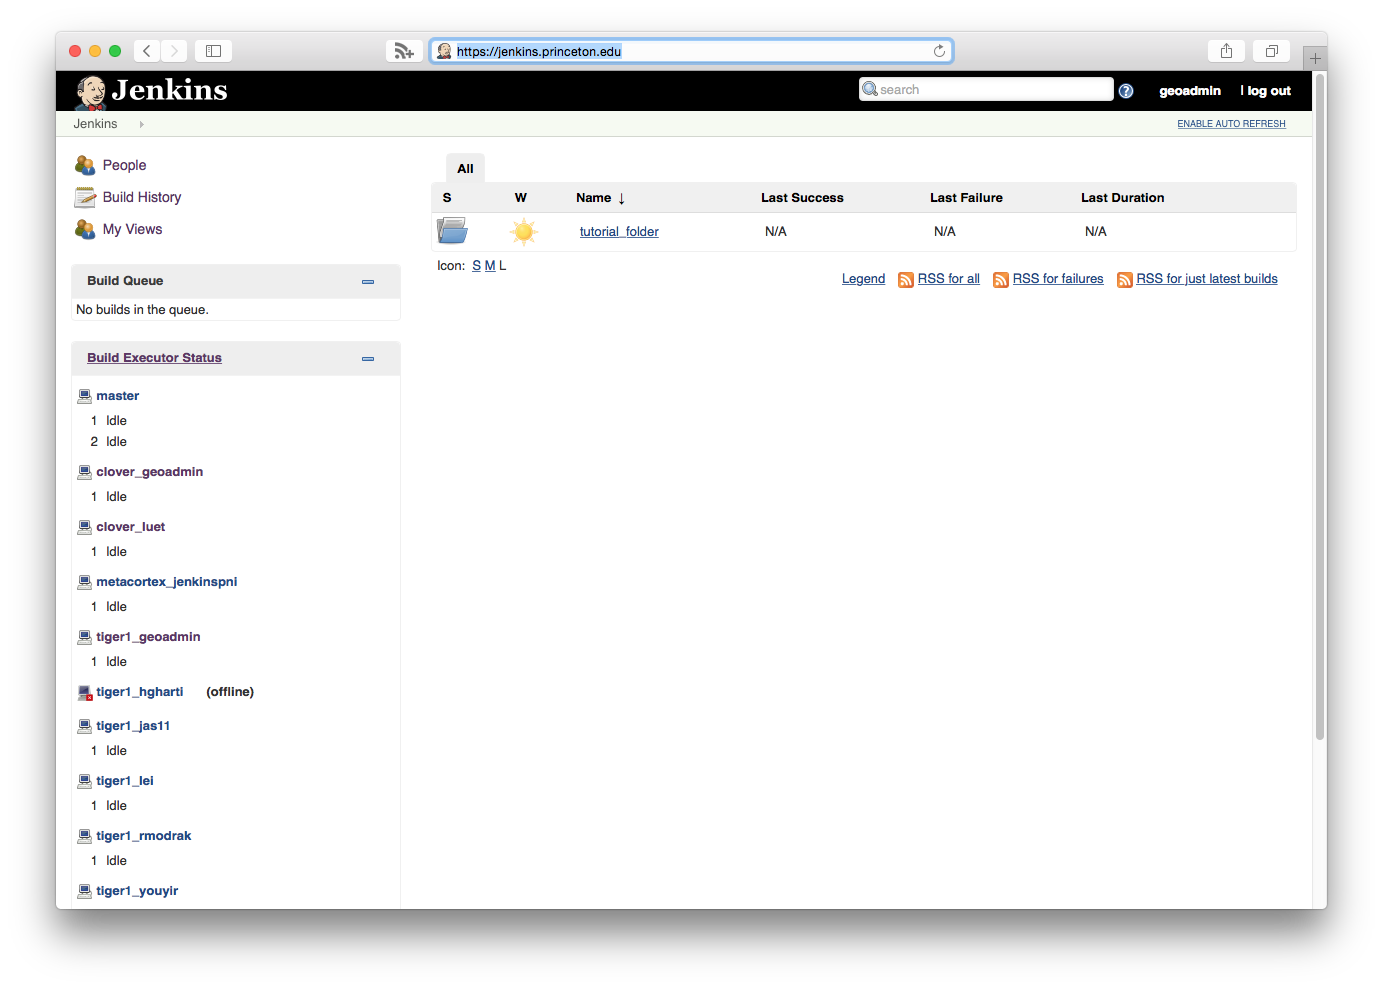
- Click on the folder.
- Click on
New Item
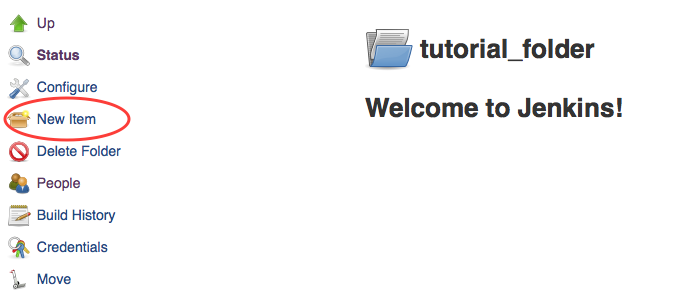
- Create a new
Freestyle projectnamedjenkins_tutorial. ClickOK.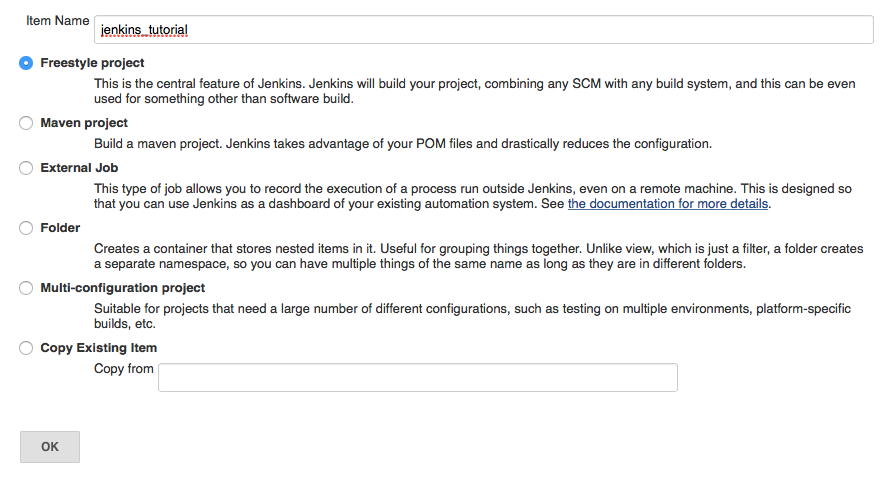
3.1.1 Project Identity And Build Rotation
First, to save disk space on the Jenkins server, we will only keep the build logs for 5 days with a maximum of 10 builds. You can change this to something that makes more sense to you.
- Check the box
Discard Old Builds:- Set
Days to keep buildsto 5. - Set
Max # of builds to keepto 10.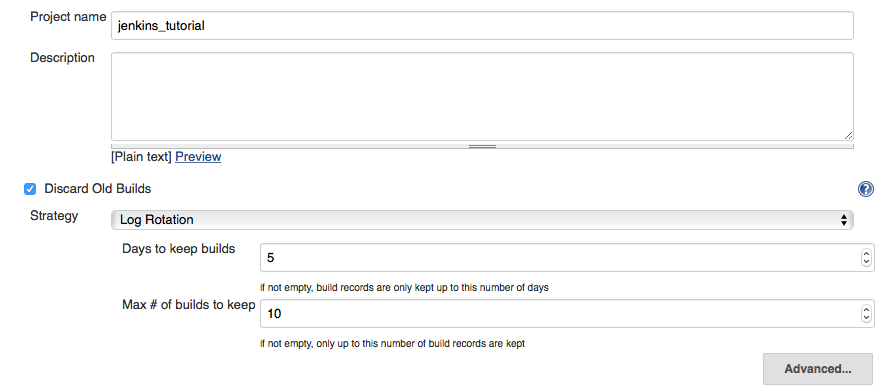
- Set
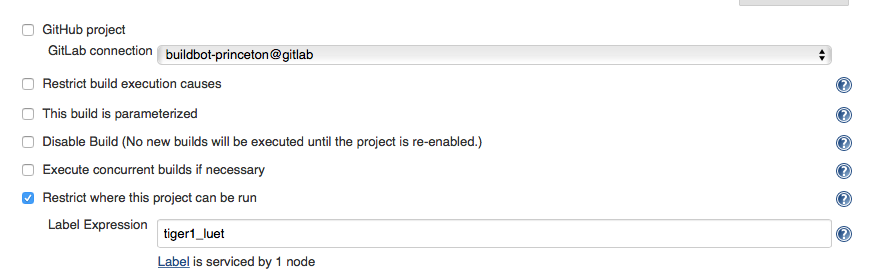
3.1.2 Slave Node
Check the box Restrict where this project can be run. In the Label Expression box enter the name of the slave that the Jenkins administrator gave you. In our case, tiger1_luet because the slave node name is tiger1 and my Princeton netid is luet.
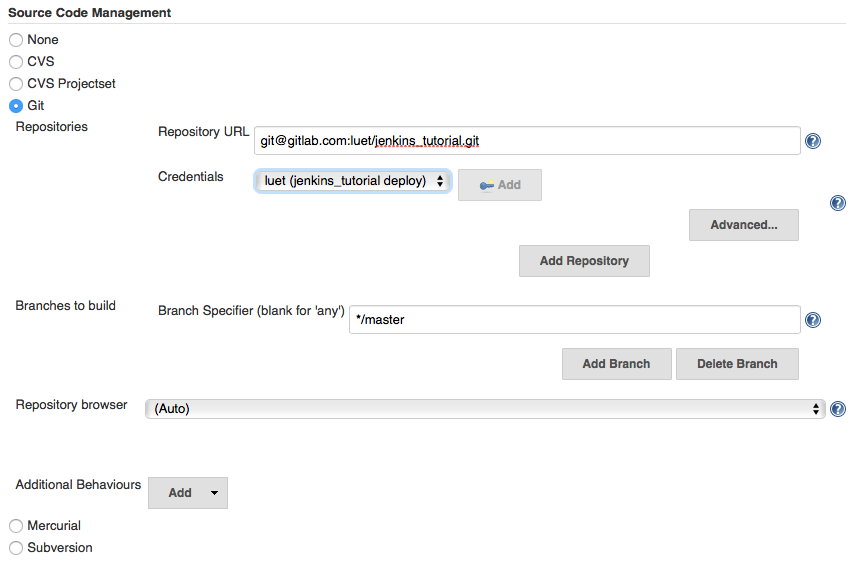
3.1.3 Source Code Management (Git)
- In
Source Code ManagementselectGit. - In the
Repository URLentergit@gitlab.com:GitLabLogin/jenkins_tutorial.git
where you should replace
GitHubLoginwith your GitHub login, which isluetin my case. - In the
Credentialsbox select the Credential you entered in Section [[jenkins_creds_for_GitLab]. It appears asluet (jenkins_tutorial deploy)in the screen snapshot below. - In
Branches to build, leave*/masterfor now. - At the bottom of the page click
Apply.
- At this point you have enough to test whether the repository can be cloned on the slave. To do so, click the
Build Nowbutton on the upper left hand side toolbar.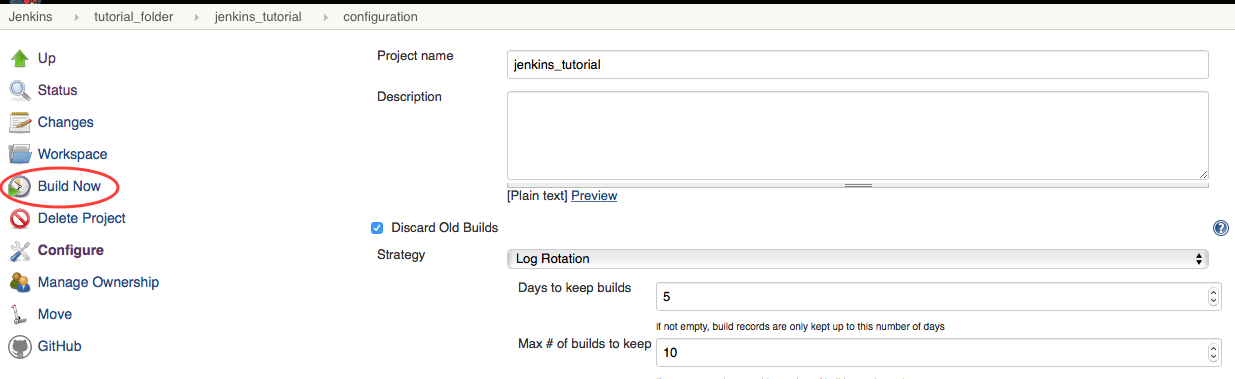
You should see a build starting in the left-hand sidebar:
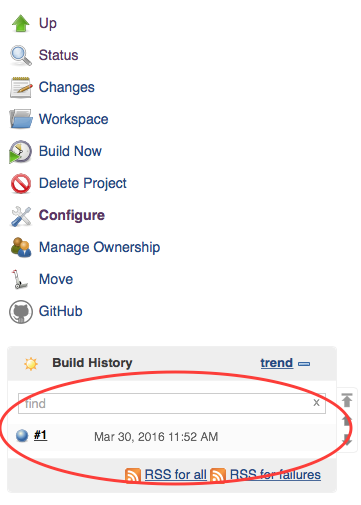
The build should run for a while and when it stops, it should have a blue ball on the left of the number.
You can also ssh onto the slave node directly and you should see that the jenkins_tutorial repository was cloned in the directory jenkins in your home directory.
3.1.4 Add a test
We will now add a test. We don't specfify any Build Triggers for now, we will be testing by triggering a build manually with the BuildNow button.
- Go to
Buildand clickAdd build stepand selectExecute shell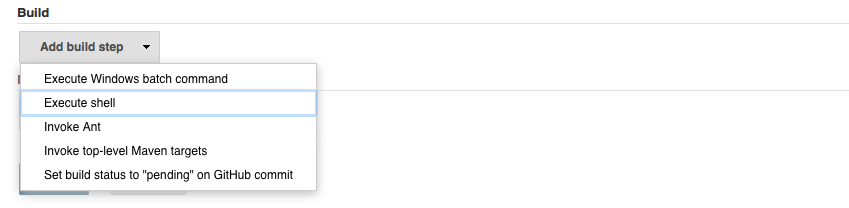
With the
Execute shellyou are basically given a shell on the slave. The current directory for this shell is$HOME/jenkins/folder_name/job_name. - In the
Execute shellbox we enter bash commands to run the test that comes with the git repository in thetestsdirectory. Note that there is no space between#!and/bin/bash, Jenkins will fail if there is a space.#!/bin/bash module load python/2.7 python test.py
Here we are running a Python unit test. This test uses the Python module
unittestwhich is only available in Python >= 2.7. - Then click
Saveto save this step.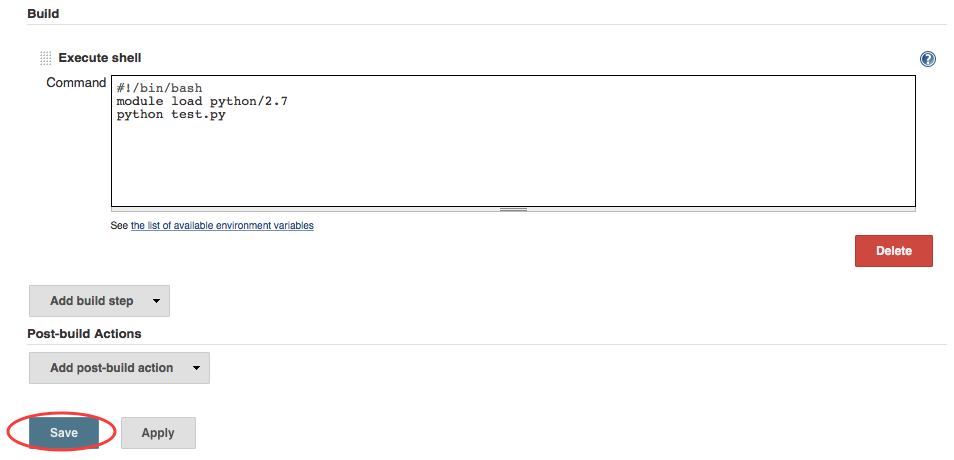
- Test this build step by clicking
Build Nowat the top of the left-hand sidebar. - After the run is done, the build history should show your test with a blue ball next to it
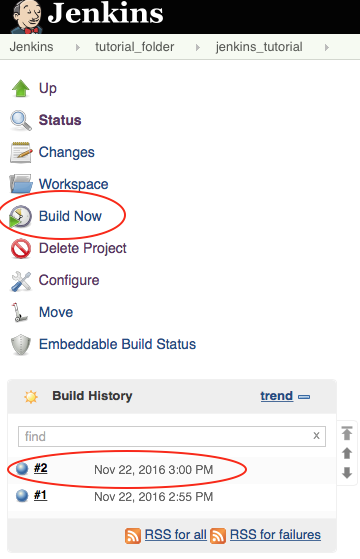
- On the figure above the last build is
#2. Click on the build number to get more details about the build.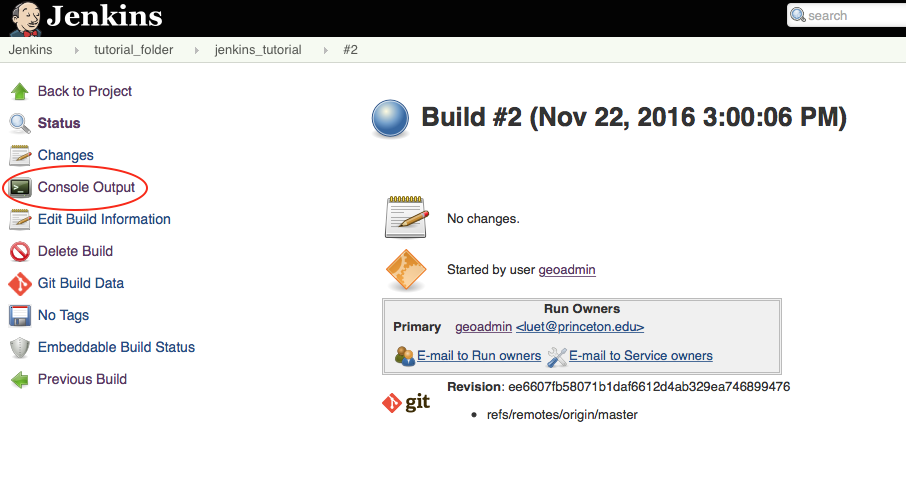
- Click on
Console Outputto standard output of your run. The build consists in two steps:- cloning (the first time) or updating (subsequent times) the code.
- running the test.
In that case the status of the test is
Finished: SUCCESS.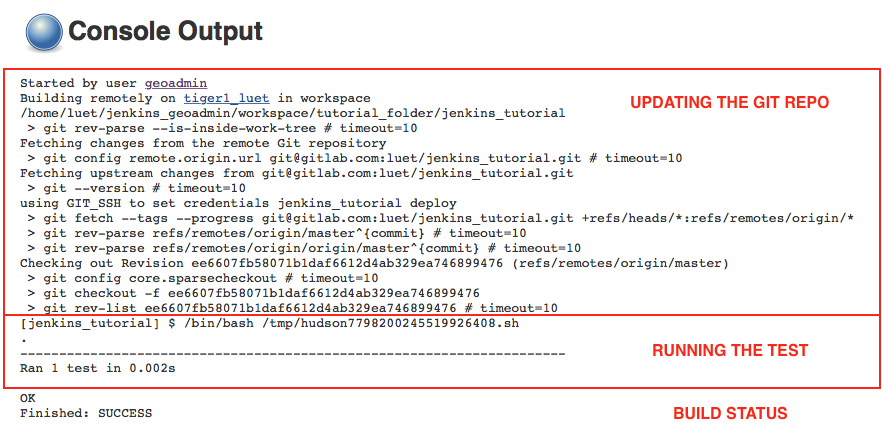
3.1.5 Add e-mail notifications
Now we will have Jenkins send you an e-mail each time a build is run.
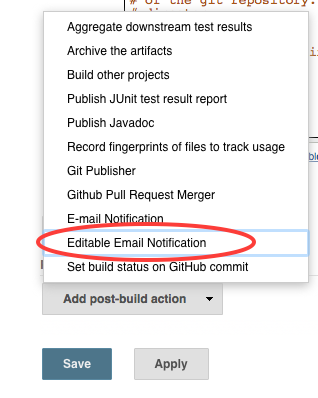
- Go to the bottom of the page, in the section
Post-build Actions.
- Click on the
Add post-build actionbutton and selectEditable Email Notification. There is another choice,E-mail Notification, but it is less configurable thanEditable Email Notification.
- In the
Editable Email Notificationbox:- In the
Project Recipient List, delete$DEFAULT_RECIPIENTSand enter your e-mail address instead
If you leave the
$DEFAULT_RECIPIENTS, Jenkins will look through the logs of the git repository and find the e-mails of all the developers. - Select
Advanced Settings...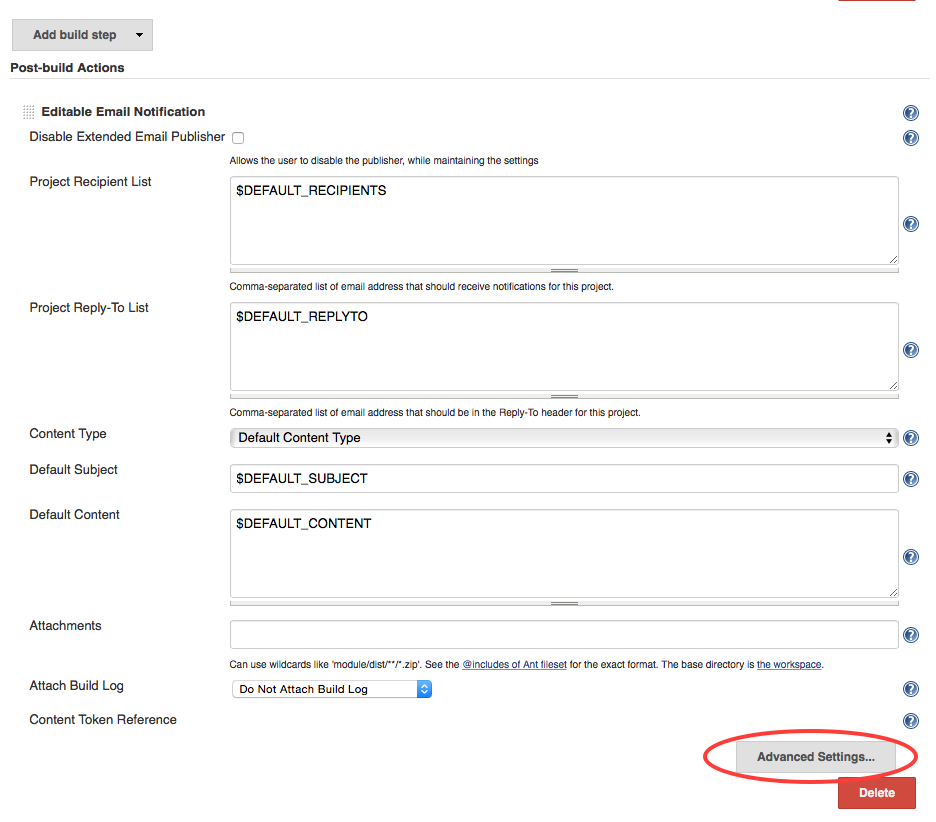
- In the
- In the
Triggersbox, remove the default trigger, by clickingRemove Trigger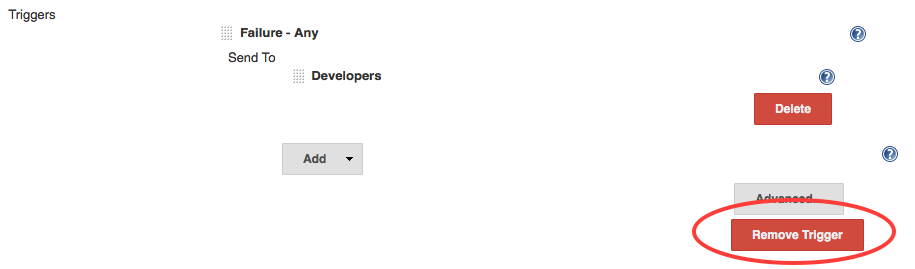
The
Failure - Anytrigger sends an e-mail only in case the tests fails. In this tutorial, we want to receive an e-mail even in case of the tests were successful. - Select
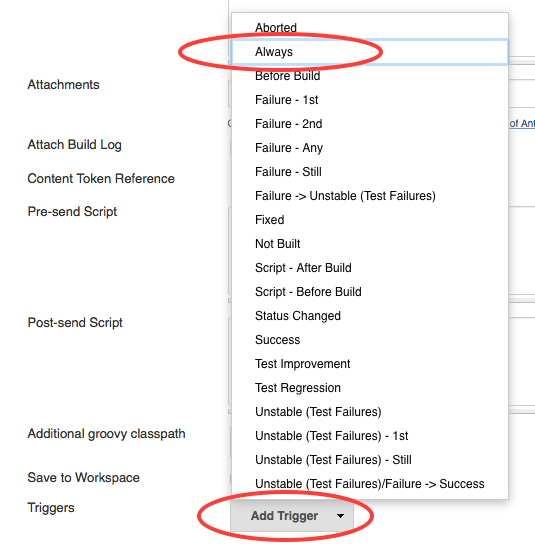
Add TriggerandAlways
- Click
DeleteunderDevelopers,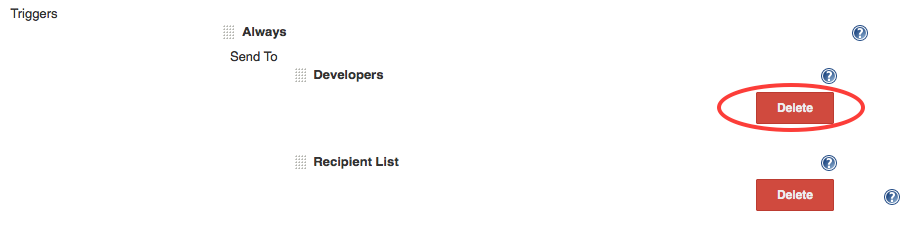
- Click
Saveat the bottom of the page. - Click
Build Nowto run a build and you should receive an e-mail.
3.2 Automatically Trigger A Build When Someone Opens a Pull-Request
Using the Build Now button is useful for testing, but in production mode you want the tests to be run automatically.
We will now add a build trigger that will start a build automatically when someone opens a merge request toward your clone on GitLab. A great advantage of testing on a merge request is that the changes are tested before they are committed to the git repository.
3.2.1 Changes on the Jenkins Server
In the Configure menu:
- Go to the
Source Code Managementand click theAdvancedbutton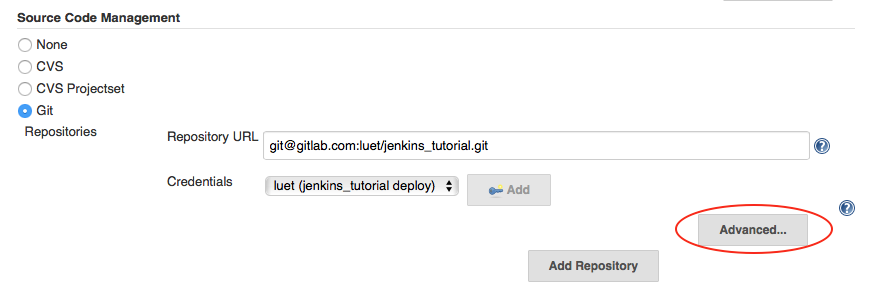
- In the
Namebox enter:origin - In the
Refspecbox enter:+refs/heads/*:refs/remotes/origin/* +refs/merge-requests/*/head:refs/remotes/origin/merge-requests/*. It is a regular expression that tells Jenkins to fetch the merge requests from GitHub.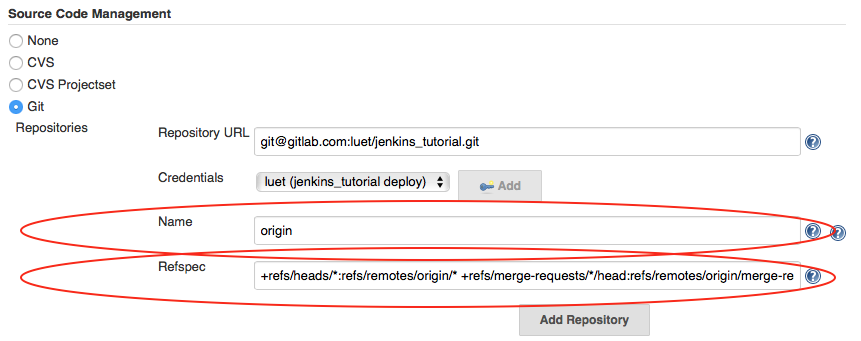
- In the
Branches to buildsection, boxBranch Specifier, replace*/masterwithorigin/${gitlabMergeRequestIid}. This tells Jenkins to use the variablegitlabMergeRequestIidthat is sent to Jenkins by GitHub. Note that at that point you cannot use theBuild Nowbutton anymore.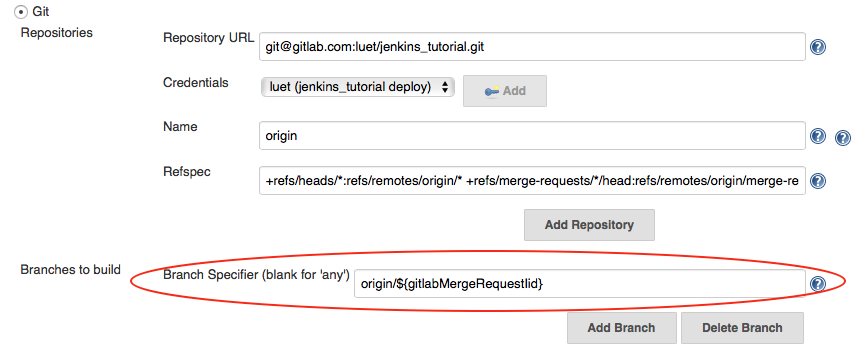
- In the
Build Triggerssection:- check
Build when a change is pushed to GitLab. GitLab CI Service URL: https://jenkins.princeton.edu/project/.... - check
Merge Request Events
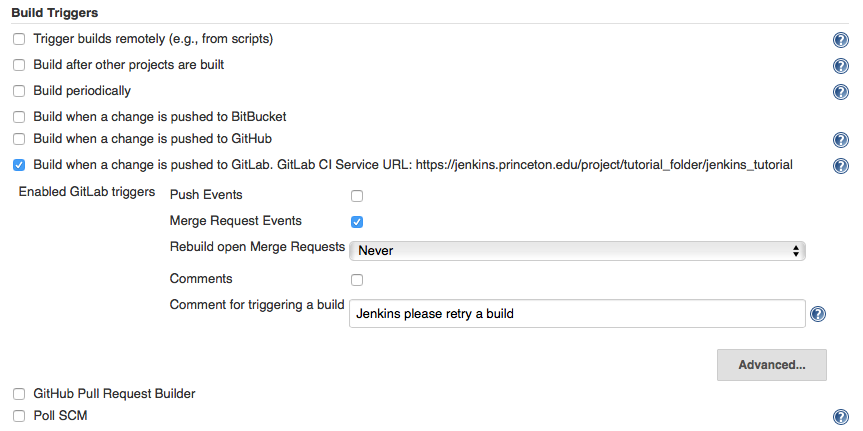
- check
- In the
Post-build Actionssection, selectAdd post-build action, thenPublish build status to GitLab commit (GitLab 8.1 + required)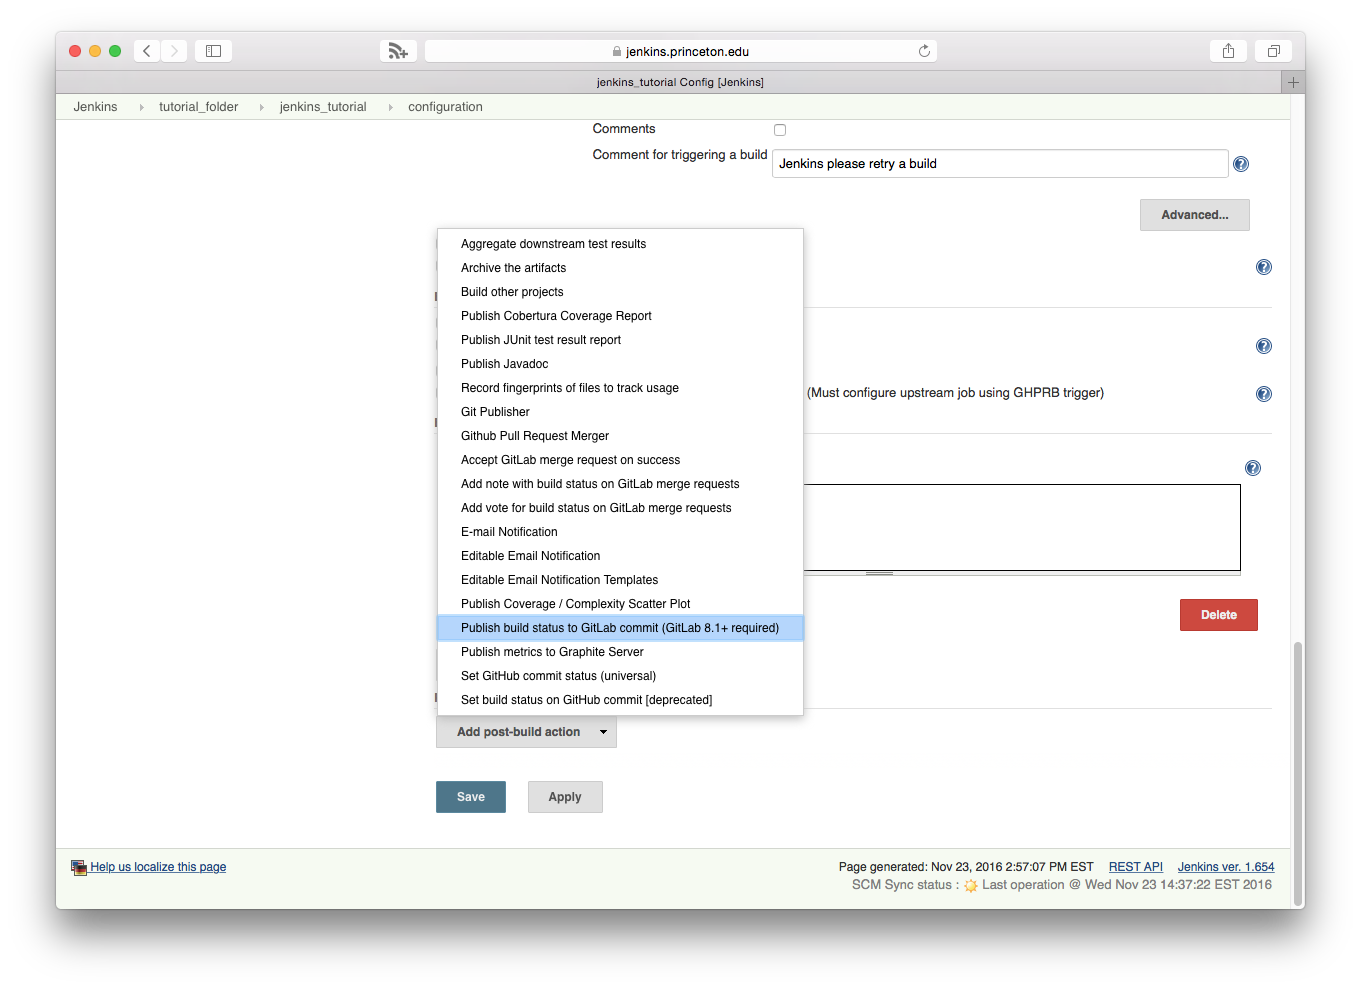
- Click
Saveat the bottom of the page.
3.2.2 Changes on GitLab
You need to add a service to your GitLab account. A service is a mechanism for GitLab to send a message to the Jenkins server when a merge request has been opened.
- Go to your fork on GitHub and select the settings button (
 )
then
)
then Webhooks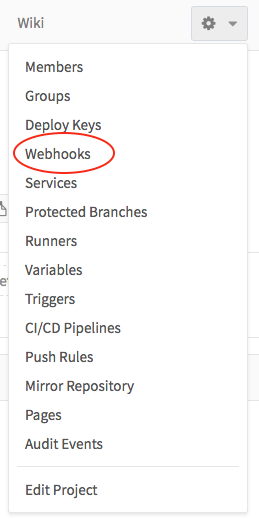
- The
URLis defined from the URL of your project on Jenkins—that is; what appears in your browser's navigation bar when you are on Jenkins. For example, in my case the URL for my Jenkins project on the jenkins site is:https://jenkins.princeton.edu/job/tutorial_folder/job/jenkins_tutorial/
and the project name for the GitLab webhook is:
https://jenkins.princeton.edu/project/tutorial_folder/jenkins_tutorial
- In the
Triggersection, selectMerge Request events. - In the
SSL verificationsection, selectEnable SSL verification. - Click
Add Webhook.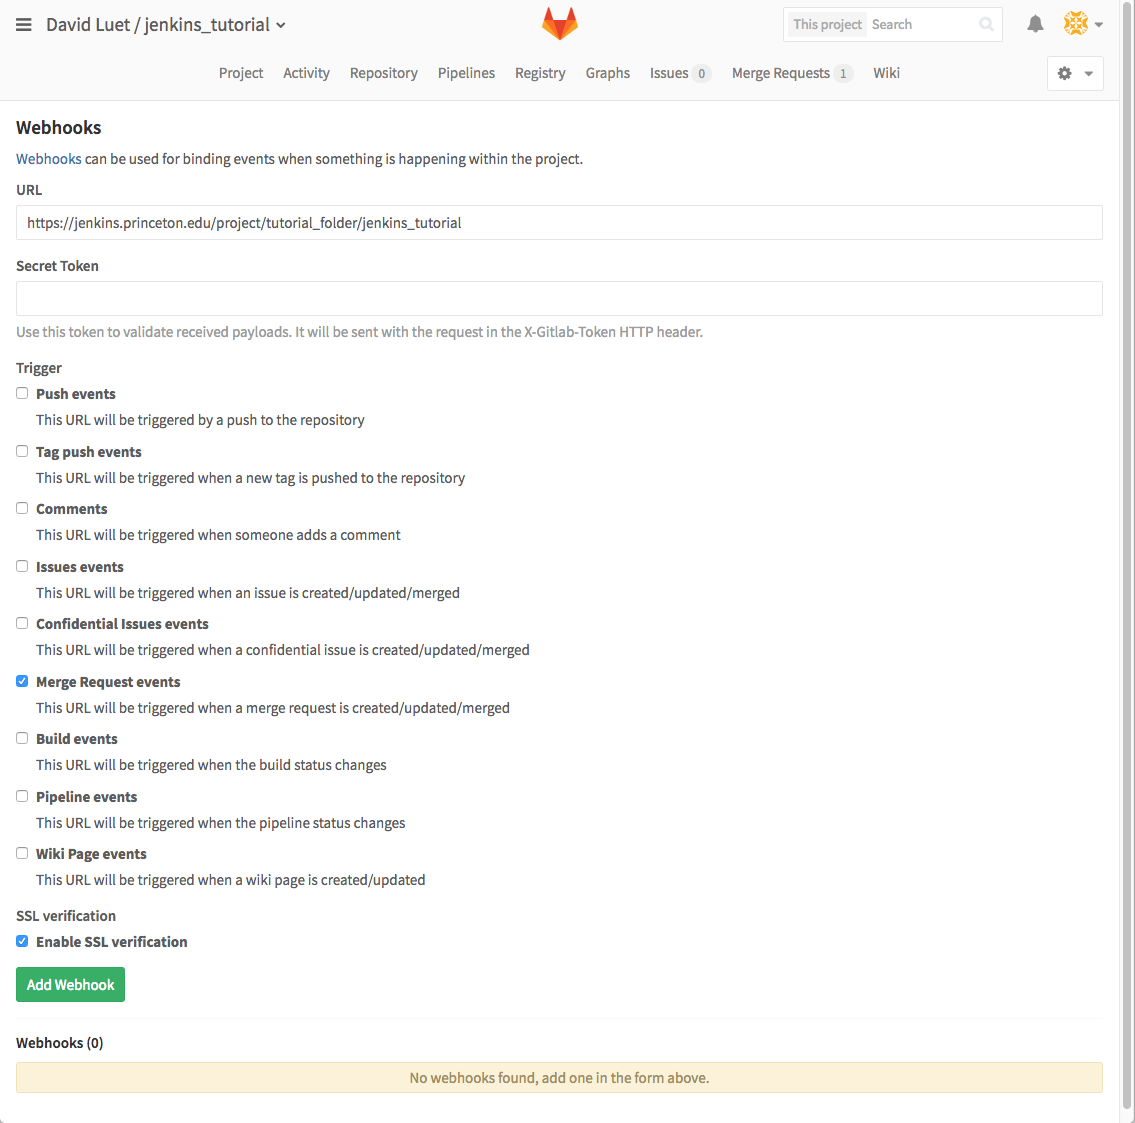
- Once the Webhook is added click
Testto test your settings.
Something like the following figure should appear at the top of your screen.

3.2.3 Open a Pull-Request To Test the New Settings
Now we will make a change to the code and open a merge request to merge the changes. We will do it directly on the GitLab web site but you could do everything on the command line if you are familiar with git. We will simply add a README.md file to the repository.
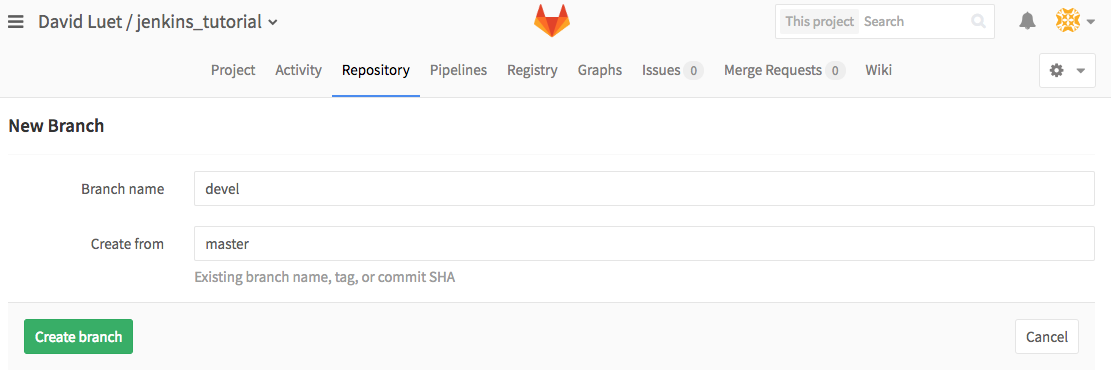
- First, we create a new branch on your GitLab repo, we call it
devel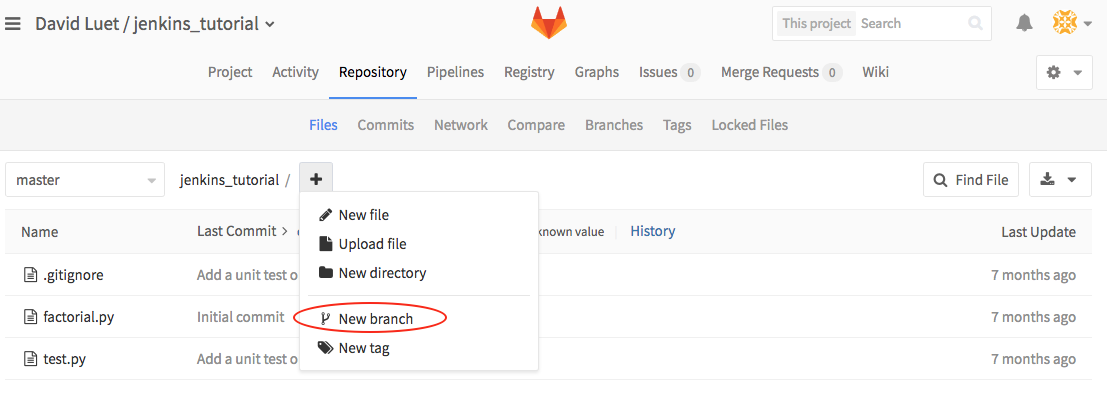
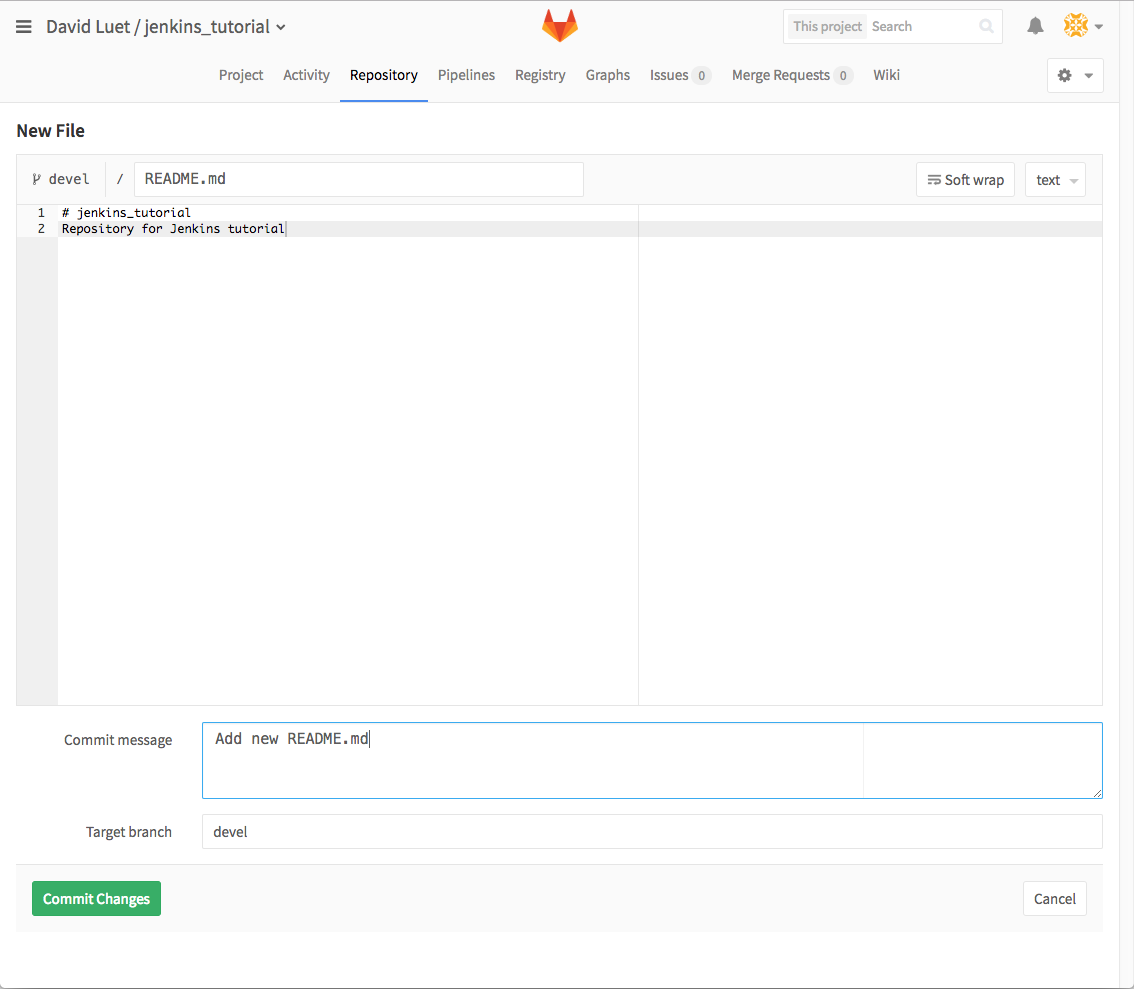
- Now create the file
README.mdin the branch devel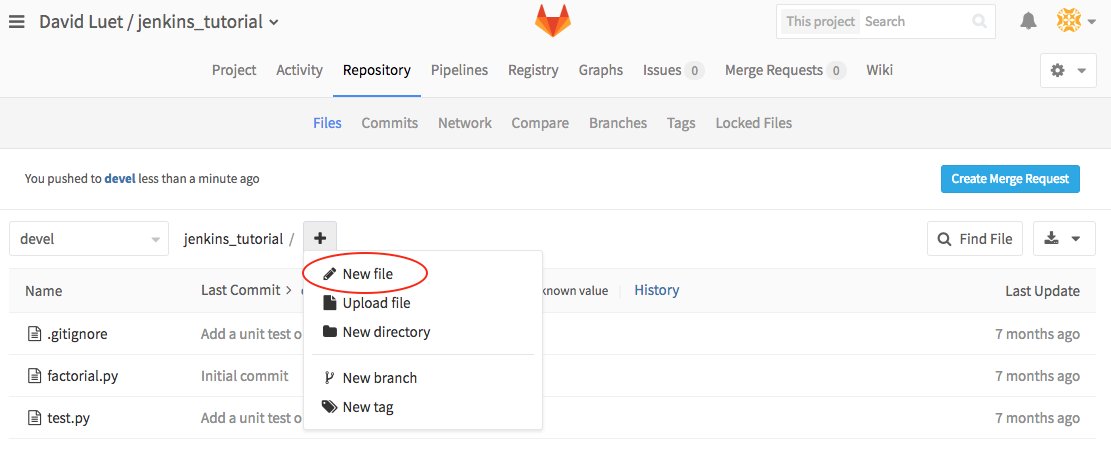
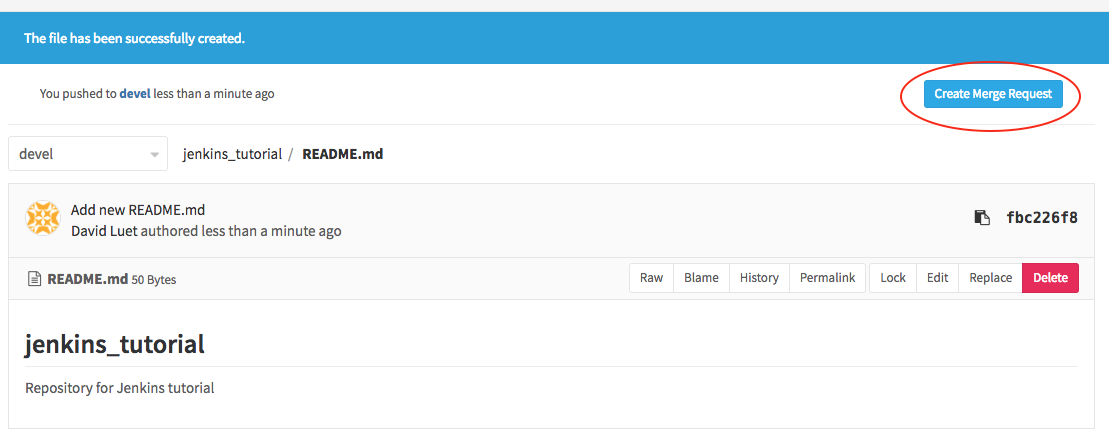
- Now create the Merge Request
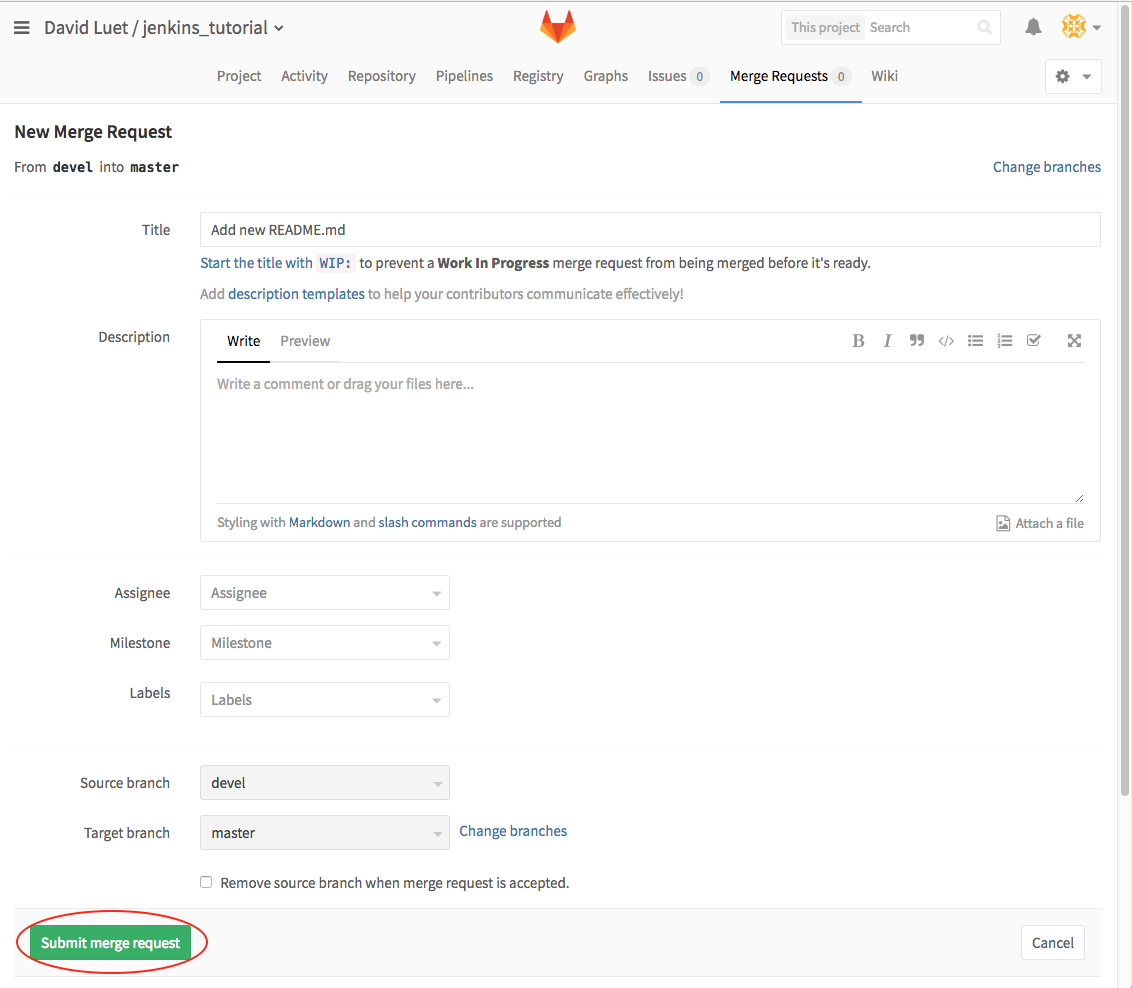
- If all goes well:
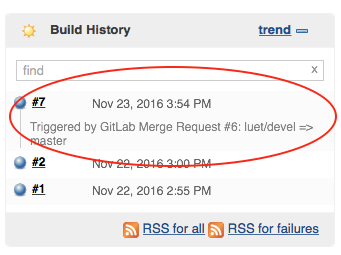
- On the Jenkins server you will see that a job was triggered
- On the status of the test will be reported on the GitLab site
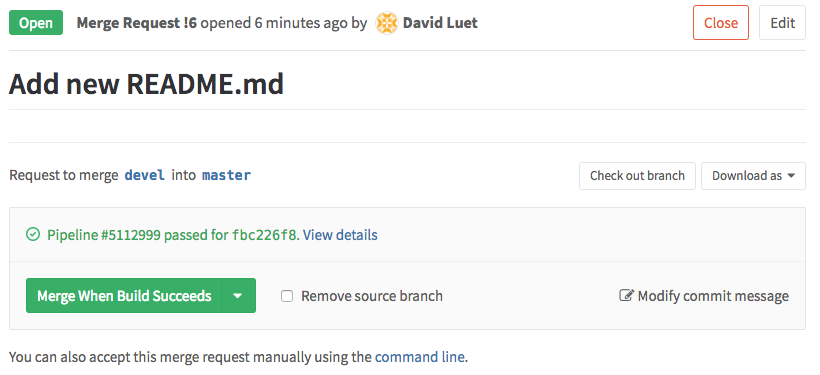
Then you can merge the changes by clicking
Merge When Build Succeeds.
- On the Jenkins server you will see that a job was triggered